 More than 10 years ago, I bought an Alpine CDA-7894 stereo for the 1977 Jeep Wagoneer I was rebuilding. That rebuild stagnated, so when the factory stereo in our 2001 Chevy Tahoe died, I moved the Alpine head unit over to the Tahoe. The CDA-7894 will read data CD's full of MP3 files (a very progressive feature in 2002), but standalone MP3 players were not yet common devices, and smartphones didn't yet exist. Fast forward to 2013, when I really wanted to be able to plug my smartphone into the truck's stereo so I could enjoy Pandora or my MP3 collection on long road trips rather than lugging along boxes of CD's. The default configuration for that stereo didn't have a convenient audio input jack, but that can be remedied with just a couple aftermarket parts.
Alpine head units of that era use what's called an Ai-Net connection to communicate with CD changers and other such devices. The Ai-Net plug is on a thick, dark blue pigtail cable out the back of the head unit. By plugging an appropriate adapter cable into the Ai-Net port, you can attach just about any other auxiliary audio source you want and play it through the car's stereo system as a standard line in.
 |
| Ai-Net plug on my adapter cable |
 |
| Adapter cable with headphone plug & jack |
Configuring the stereo
By default, most Alpine stereos of this era are configured from the factory to have the auxiliary input disabled. That's actually convenient, because if you don't have any aux sources, you probably don't want to have to tab past the useless "AUX" option every time you switch input sources from disk to tuner. You may as well enable the AUX setting before you do anything else, while the stereo is still conveniently mounted in the dash. I've never been fond of Alpine's user interface. The specifics of how to turn the auxiliary input back on were a little tricky to find online, but not difficult to perform:
- Hold the "F" (function/setup) button for 2 seconds until "NORMAL" is shown on the display. This button is just left of the #1 preset on my CDA-7894 model.
- Press the fast fwd/rev (track up/down) buttons until "AUX OFF" is shown on the display.
- Press the "BAND" button to toggle the "AUX" setting to "ON."
- Press the "F" button again to leave setup.
Now, when you repeatedly press the "SOURCE" button, "AUX" will show up as one of the options alone with "TUNER" and "DISC."
Hooking up the adapter cable
Before I started hacking things up, I wanted to test my theory by plugging the new cable into the back of the stereo.
The first step is to remove the dash board trim bezel. On our 2001 Tahoe and similar-era GM trucks, this is done by simply pulling it straight toward you until it pops off. You'll need to tilt the steering wheel all the way down, set the e-brake, and shift the transmission into first gear in order to get the shift lever out of the way so you can completely remove the dash bezel. You can't turn off the key with the tranny in gear, so the only way to silence that infernal bell is to close the driver's door. Once the dash is off, I recommend you do most of your work while sitting in the front passenger seat.


Next, pull the stereo out of the dash. In a factory setup, there are two little clips, one on each side of the stereo. Squeeze the clips downward to release them, then slide the radio out toward you. You should be able to pull it completely out of the dash (but not much farther) before you use up all the slack in the cables. I just let my stereo hang there by the cables while I did the rest of the work.

On my CDA-7894, the Ai-Net cable is a thick (1/4" or 6mm), dark blue cable that's about 12" long with a large, black, plastic connector on the end. Plug your new adapter cable into this. Be sure you plug it in the right way -- I was able to put it in backward with a little bit of force. If you look closely at both plugs, you'll see some rather ineffective, plastic keys that are supposed to prevent backward insertion of the plug.
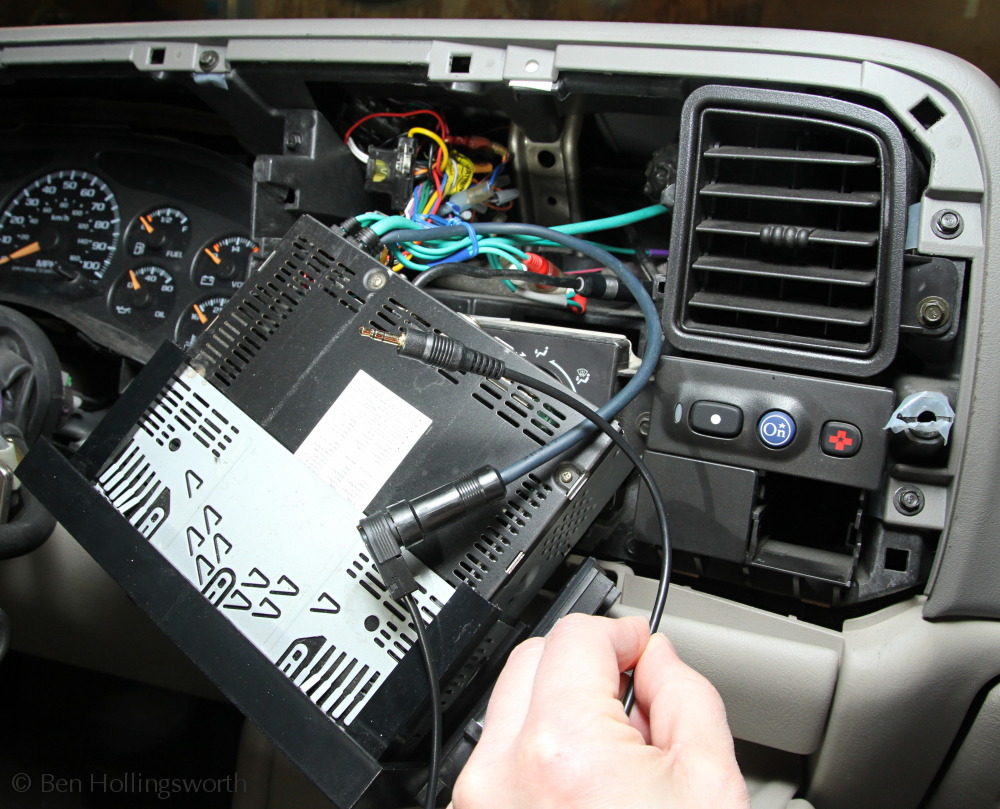 |
| Blue Ai-Net cable wtih black headphone adapter cable |
Plug the other end of the cable into your phone/player. Turn on the stereo and set the source to AUX. Play some music on the phone. On my Samsung Galaxy Note II running Android 4.1, I found that I had to turn the phone's volume up all the way in order for the resulting stereo's volume to be similar to that of the radio tuner. If everything checks out, your phone's tunes will be coming out of the truck's speakers.
If you only want a quick & dirty solution, you can find a way to route the Ai-Net headphone cable out the bottom of the dash. Reinstall the stereo & dash bezel, and you're done.
Installing a headphone jack in the dash
To clean up the installation, I installed a 1/8" headphone jack in the dash instead of letting the adapter cable hang loose all the time.
I chose to locate the jack in one of the pop-out square panels right below the OnStar controls. I know GM changed the dash layout significantly between years, and even among models of the same year, so this location may not exist on your truck. GMC Yukons, Cadillac Escalades, Chevrolet Suburbans, and Sierra pickups may all be different. I'm sure you can find some other 1/2" square of free space in which to mount your jack, though. The fact that this little panel is removable from the rest of the dash board made the installation much easier. With the dash bezel off, there's a plastic clip on the side of this panel that holds it in place. There's another plastic clip on the other (hidden) side of the panel, but that one will just wiggle free once the first clip has been released.
|
|


To get from the stereo to this panel, feed the cable behind and below the HVAC vent. There's a large, open cavity that allows for easy cable routing from the stereo to this panel. Figure out how much cable is needed to reach from the Ai-Net plug to the dash panel, remembering to leave enough slack to remove the radio again someday. In my case, this was about 16". Unplug the cable from the stereo & move to a workbench. I marked my cut location with a piece of tape.

Cut the 48" adapter cable in two. The end with the Ai-Net plug (about 16" long) will be permanently installed behind the dash. The end with the 3.5mm plug (about 32" long) will be your extension cable that connects the phone to the dash.
From Radio Shack, you can buy a panel-mount 3.5mm jack and a matching 3.5mm plug. Solder the 1/8" plug onto the 32" cable, making a male-male headphone patch cable. Solder the jack onto the 16" wire with the Ai-Net plug.


 |
| The hidden Ai-Net cable and the external patch cable |
Then, drill a 1/4" hold into the dash panel and bolt the jack into place on the panel.


 |
| The "hidden" cable ready to install |
Back in the truck, I fed the Ai-Net cable up through the dash opening and into the back of the stereo cavity. I plugged it into the stereo's Ai-Net cable and then snapped the dash panel back into place. Ai-Net plug has a very secure fit, so I have zero fear of it jiggling loose over time. Slide the stereo back into the dash, making sure to feed the wires as far back as possible so you don't crimp them with the stereo. The dash board bezel snaps back into place the same way it came off.
 |
| Before |
 |
| After |
 |
| After |
The end result is a nice, clean installation. The only apparent difference from stock is little 1/8" headphone jack right below the OnStar buttons.
 The 32" patch cable that I made is a perfect length for front seat passengers. It's just long enough to hold the phone in your hand, but not so long that it gets in the way when the phone's sitting by the cup holders. It is far too short to reach the back seat, so if you want to plug a movie player into the stereo, you'll need another extension cord.
Of course, this is 2013, and many modern head units come with headphone plugs built into the front of the stereo. Still, I'm sure there are plenty of older radios out there that could benefit from this little trick.
What other custom stereo setups have you enjoyed? I'd love to hear about them in the comments below.
Excelente article and professionally done 5 stars
ReplyDeleteVery helpful!!!
ReplyDelete