
When I stuck my head under the dash, I found brake fluid leaking down the inside of the firewall near the top of the clutch pedal, which confirmed that the clutch master cylinder was the problem. If everything had been clean under there, it would have pointed to the slave cylinder (located down by the bellhousing) as the likely culprit.
 |
| The new clutch master cylinder |
The 1994 and later Wranglers (like mine) used an external slave cylinder that's bolted to the outside of the bellhousing on the left side of the transmission. This slave cylinder does not have any bleeder valve, and is intended to be replaced as a single assembly along with the master cylinder. It comes off with just two nuts, though.
When I called the various parts stores, they all had a replacement master cylinder in stock for about $40. None of them had the entire dual-cylinder assembly in stock, but they wanted over $200 to order it. (You can order the entire assembly from Amazon for about $130.) I decided to get just the master cylinder and see if I could figure out a way to bleed it. It was the right choice.
 |
| Master / slave assembly |
Removing the assembly is pretty easy:
- Up under the dash, pull the cotter pin that holds the top of the clutch pedal to the plunger on the master cylinder. Pop the plunger off the pedal.
- Under the vehicle, unbolt the slave cylinder from the transmission bellhousing. It's held in place by two 1/2" nuts on studs. There's not a lot of clearance for the upper nut, so a pneumatic ratchet and a deep well socket worked very well. The plunger with the two plastic sticks just pulls out of the cylinder, and you should do that now so you don't catch it on something when removing the assembly.
- Snip the one or two zip ties that hold the hydraulic line in place between the two cylinders.
- In the engine compartment, unbolt the master cylinder from the firewall. It's located just outboard of the brake booster. It's also held in place by two 1/2" nuts. The lower nut comes out easily with a socket, a U-joint, and a few inches of extension. The upper one is directly behind the master cylinder's fluid reservoir, so you can't get a socket on it. It's also hidden beside some cables and the cowl, so you can't use a ratcheting box wrench on it, either. Fortunately, I had a ratcheting open-end wrench, which is an open-end wrench that's notched to allow you to quickly ratchet back & forth, even at a slight angle. It's the perfect tool for this nut. Without one, you'll spend a lot longer using a standard box wrench on it.
- Once everything's unbolted and the zip ties are cut, snake the whole assembly up through the top of the engine bay. Be careful not to damage the plastic, pre-formed hydraulic line.
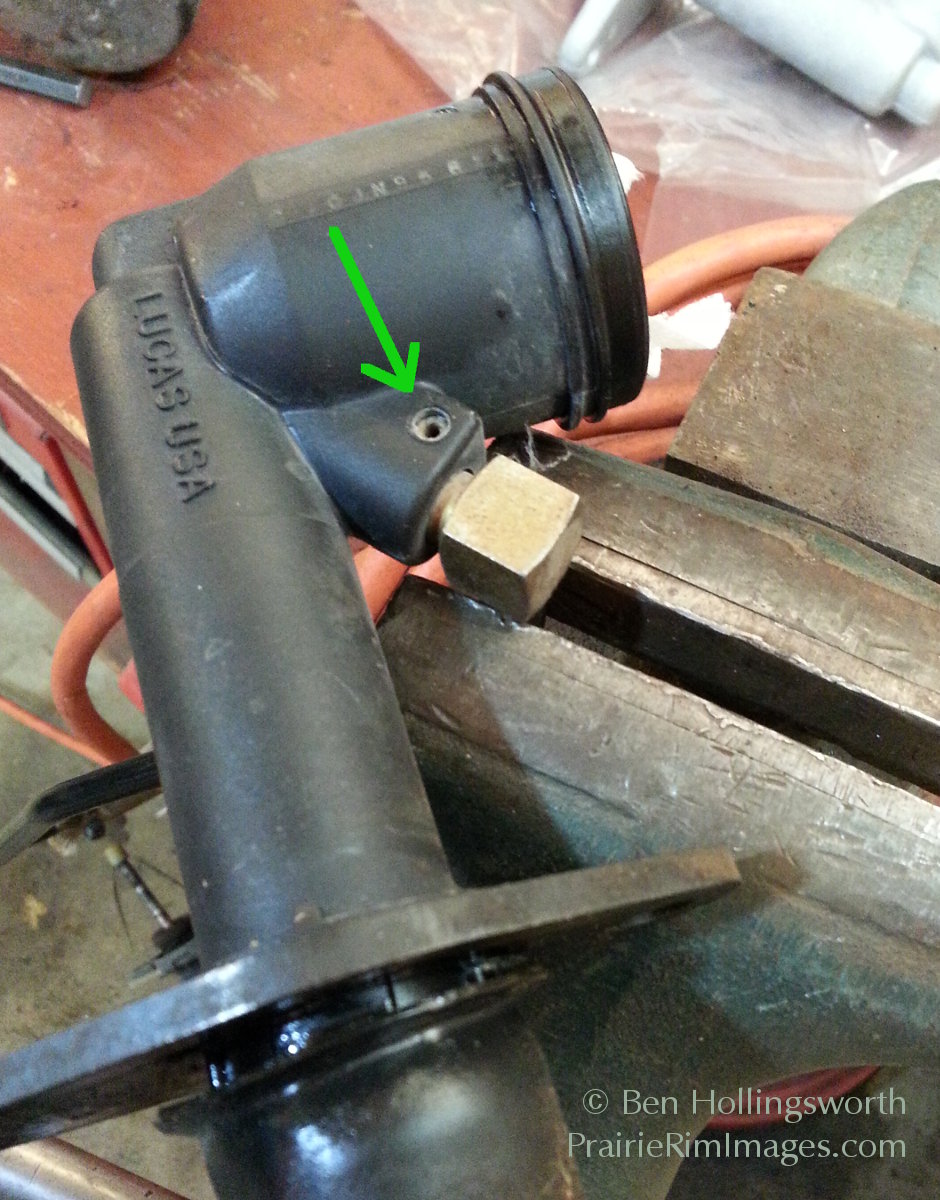 |
| The roll pin to be removed |
Next, disconnect the hydraulic line from the master cylinder by pressing the little roll pin out of its hole. I set the master cylinder on a bench vice and used a roll pin punch to hammer the pin out. With the pin out, the hydraulic line will pop right out. Verify that the rubber O-ring is in good shape, and replace it if it's not.
Reinstall the hydraulic line and roll pin on the new master cylinder, making sure that the line comes off the cylinder on the proper side (toward the engine). Just squeeze the roll pin into place with channel lock pliers.
Now comes the fun part: bleeding all the air out of the hydraulic line so that your clutch pedal isn't squishy. This is actually really easy to do, as illustrated by this video:
You basically secure the master cylinder in a bench vice or other elevated position, fill the fluid reservoir with DOT3 brake fluid, and repeatedly pump the slave cylinder's push rod until you no longer get air bubbles coming out of the reservoir. Tap on the line periodically to help release the bubbles. I didn't see any need to attach a puller to the slave assembly; I just used the factory push rod.
Once the bubbles stop, top off the fluid to about 1/4" below the top of the reservoir and tighten down the cap for all you're worth. If it's not tight enough, fluid can leak out when you push the clutch pedal. I had to use channel locks to get the lid tight enough. Test how tight the pedal action is by holding the slave cylinder push rod in place and trying to depress the master cylinder's push rod. You shouldn't have much more than 1/8" of play.
 |
| Original (left) and new (right) master cylinders |
If everything looks good out on the bench, it's time to reinstall the assembly using the opposite procedure describe above to remove it. When installing the slave cylinder, make sure the end of the push rod is located in the right spot on the clutch lever in the bellhousing. All four nuts should be tightened to about 25 ft-lbs. Don't forget to replace the zip ties that you snipped earlier, since you won't want the hydraulic line to get damaged.
Once I had everything running again, I was surprised at how far off the floor the pedal had to be to engage the clutch. I guess my hydraulic system had been slowly declining for quite a while.
All in all, this is a pretty easy job if you've got the right tools. The pneumatic ratchet and the ratcheting open end wrench sped things up quite a bit. For me, the worst part was having to lie on my back in the puddles of melted snow that were running off the Jeep in my heated garage. Now that I know what I'm doing, I could probably do this job again in less than an hour.
If you've got any questions or suggestions, be sure to hit me up in the comments below.
No comments:
Post a Comment
Please leave your comment below. Comments are moderated, so don't be alarmed if your note doesn't appear immediately. Also, please don't use my blog to advertise your own web site unless it's related to the discussion at hand.